ArtCraft and PhotoCraft tutorial: how do you install it and make a first edit?
Install the build that matches your operating system from the upstream release, launch it, and learn four things before touching your own work: where panels dock, how layers stack, what the history keeps and how saving a PSD differs from exporting a flat file. This walkthrough covers Linux, Windows, macOS and FreeBSD, plus the browser build.
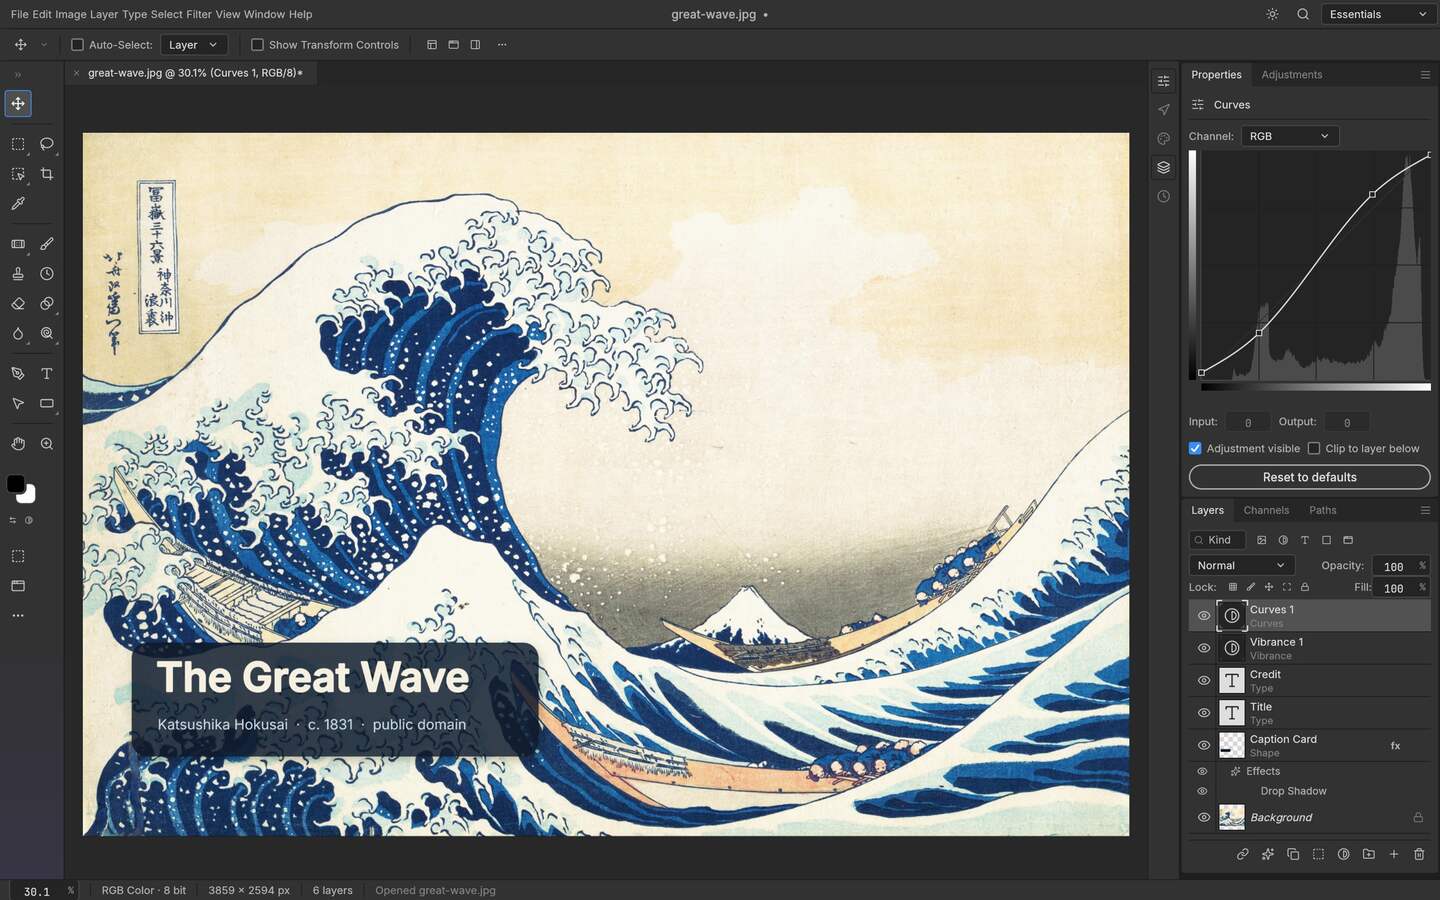
Upstream PhotoCraft interface preview; the artwork shown in the repository is public-domain source material. View the GitHub asset
What you need before starting
A machine with a GPU-capable driver: Metal on Apple silicon and recent Intel, Vulkan on Linux and Windows, DX12 on Windows. Software fallback exists but the canvas feels slower.
Around 1 GB of free disk for the application plus space for your own files.
On Linux, either FUSE for AppImage or your distribution's package manager for deb, rpm or flatpak.
No account, no licence key and no network access for editing. PhotoCraft works offline.
Install on Linux
Pick the package
AppImage is the quickest: one file, no installation, no root. Choose deb or rpm if you want the update cycle handled by your package manager, or flatpak if Flathub is configured.
Download the archive and the checksum file
Both come from the same release tag. Keeping them in one directory lets you verify the file you are about to run.
Check the digest
Run the SHA256SUMS check against the release file. A mismatch means the download is not what upstream published.
Make it executable and launch
chmod +x on the AppImage, then run it. In a container without FUSE, extract and run instead of mounting.
Install on Windows, macOS and FreeBSD
Per-platform notes
Platform
Build
What to expect on first launch
Windows x64 or arm64
MSI installer or portable zip
SmartScreen warns on a fresh publisher. Confirm the checksum, then choose More info and Run.
macOS universal
DMG
Gatekeeper quarantines an unnotarised build. Right-click and Open once, or clear the quarantine attribute.
FreeBSD x86_64
tar.gz
You are running the same engine on a less-tested platform; expect to supply your own GPU driver and libraries.
Browser
WebAssembly archive you serve
Nothing uploads. Treat the tab as the editor, not as a cloud service.
The interface, in the order you will actually use it
The workspace is a docked layout rather than one canvas with a toolbar. Panels can be moved, grouped and closed, and the arrangement you leave is the arrangement that returns next session — the current release reworked docking onto a shared model while keeping panel controls and saved workspaces intact. Three panels carry most of the work: the layers panel on the right, where stacking order and masks live; the tool column, which holds brush, move, transform, text and vector tools; and the file info panel, which in recent builds also surfaces camera data read from EXIF and XMP.
Your first edit, step by step
Open a file
Use Open rather than drag-and-drop the first time, so you can see which format the editor decided it is. A layered PSD opens with structure; a flat JPEG opens as one background layer.
Duplicate the base layer before anything else
Keep the original pixel layer intact. Every subsequent change belongs above it.
Add an adjustment layer instead of painting on pixels
Adjustment layers sit above the stack and affect what is beneath them, so exposure and colour decisions stay reversible.
Mask rather than erase
A layer mask hides without deleting. If the composite is wrong you fix the mask; you do not lose the layer.
Save the project, then export the deliverable
Save as PSD or the native project format to keep layers. Export a flat PNG or JPEG for delivery. These are two operations and the second one should never be your only copy.
Reading the result
A good first outcome looks like this: the file reopens with every layer still present, the adjustment layer can be switched off and the image returns to its original state, and the exported flat file matches what the canvas showed at full resolution. If any of those fail, note the exact build tag rather than assuming your technique is wrong — this is an alpha project and layer handling is one of the areas that still moves.
When it does not work
Common first-session failures
Symptom
Likely cause
What to do
Canvas is black or flickers
GPU path selected a driver that does not support the required feature set
Start with the software renderer, then update the driver and retry
PSD opens without layers
The file uses a feature the reader has not implemented yet
Re-open the original; report the file; keep working from the source rather than a re-exported copy
AppImage will not start
FUSE missing on the host
Extract and run, or install the deb or rpm build
Everything is slow at high zoom
Large canvas on an integrated GPU
Work at a reduced preview zoom and check the full-res export before shipping
Where to go next
Once the panels feel ordinary, the two things that change how fast you work are keyboard shortcuts and the batch path. Both are covered separately here: the PSD workflow guide for layered files, and the CLI and MCP guide for running the same edits over a directory instead of by hand.
Who this is for
Batch-correct a folder of product shots without opening each one
Do destructive-free colour work on client files you must be able to reopen
Run an editor on Linux that reads layered PSD rather than flattening on open
Keep editing possible on a machine with no network and no subscription
Limits worth knowing
PhotoCraft is early alpha: panel layout and file handling can change between releases, so a guide carries the version it was written against.
There is no generative AI inside the editor. It edits pixels you already have.
Photoshop plugin compatibility is not a goal of the project, so workflows built on filters from another ecosystem need rebuilding.
Questions this guide gets asked
01
Which Linux package should I install first?
Take the AppImage unless your distribution already manages your applications. It is one file, needs no root and leaves nothing behind, which makes it the fastest way to find out whether the editor suits your machine before you commit to it.
02
Do I need a GPU for the first session?
You can start without one, but the experience differs. The editor selects a rendering back end per platform, so a machine without a modern driver falls back and large canvases feel slower. Judge the tool on hardware close to what you will actually use.
03
Will my files upload anywhere during install or editing?
No. Both the desktop builds and the WebAssembly build process locally, and there is no account or licence key anywhere in the workflow. The only network traffic worth mentioning is whatever you choose to do after the editor is open.
04
What breaks most often in a first session?
Expectations rather than crashes. People open a complex layered file, find one effect interpreted approximately and conclude the whole editor is unusable. Check structure first, then judge individual effects against a flattened reference.
05
How do I know which version this guide was written for?
The source bar names the release tag and the verification date. Panels in an alpha move, so a guide that does not state its version is a guide you should distrust rather than follow.